Pages

Showing posts with label cardmaking ideas. Show all posts

Thursday, 17 March 2022

Artful Tulips thank you card

 I have been so lucky this week to get the opportunity to help create samples for one of Spellbinders NEW releases. Todays card is created using the Artful Tulips dies designed by the talented Vicky Papioannou.

I kept this card fairly clean and simple. As simple as I could... I don't do negative space very well you you will see very subtle stencilling in my white space. I kept the colours to purple tones to make the design simpler.. and because I shall send it to my friend who loves purple.
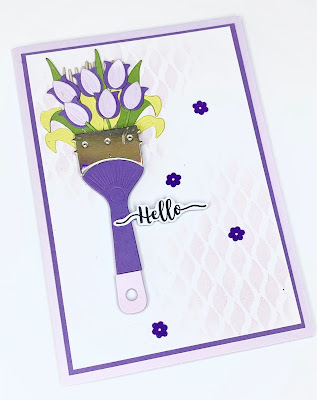


I think this turned out really pretty. I especially love how the dies also emboss, giving texture to the shapes. Also this one cuts each element separately so you can mix and match your colours. 

These are available direct form Spellbinders... Sadly I wasn't fast enough setting up my affiliate account to have personal links.. Snooze ya loose but I'm thrilled to have been part of this new release.

Thanks for sharing this card with me have an outstanding day .

x Amanda

Monday, 14 February 2022

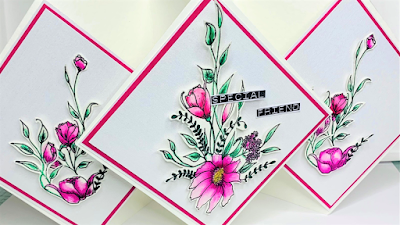
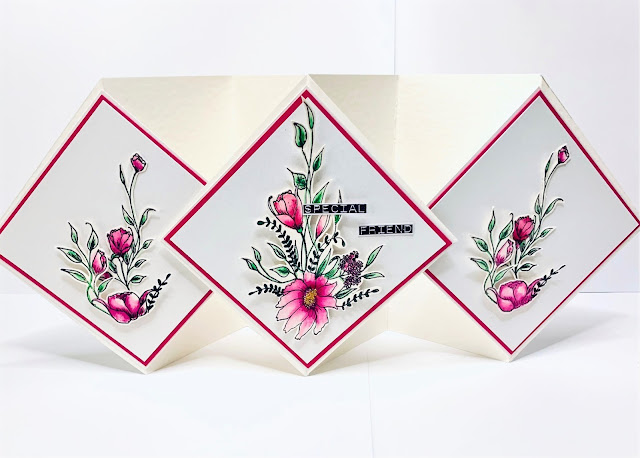
Triple floating diamond card

Triple floating diamond card tutorial.

Hey everyone today I am sharing what I think is a different kind of fold. I have searched and cannot find one exactly the same. I call this a triple floating diamond card easy to, make hard to photograph ! 


The cards main feature of this card is the three diamond panels perfect for elaborate decoration. Those who are sharp eyed card makers will see this is inspired by the diamond easel card.. I doubled it up and created a different fold. \the Diamonds move and you can display the card several ways I came up with four different senarios depending how you stand it making this card super versatile.


I kept the card base plain so all the focus is on the stunning florals. These are created using Sketched flowers from the Floral Script collection by Lou Collins you can find the set used via this link https://tidd.ly/3gQOPaZ. I stamped using Archival ink on water colour paper and then painted the images. Once dry I cut them out but there are co-ordinating dies for this stamp
here  https://tidd.ly/3HO0MK1 for those who don't enjoy fussy cutting. I think you will agree these are simply stunning. 

I have a full real time tutorial with instructions and measurements here so you can learn this card too. I do hope you will give it a try and add this fancy fold to your collection of cards you can make easily at home.

Happy crafting xx Amanda


Thursday, 3 February 2022

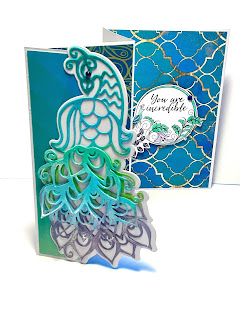
Peacock plumes concertina fold tutorial


I made a card !!! my first in a very long time.

Those who have followed my blog will know I shared cards LOTS and kinda lost my love for it. After being contacted by Craftstash UK to share some of their designers products I thought I would tip my toe back in the water. This set made me fall in love with cardmaking all over again ... there will be more to come.

I have been working with the Peacock Plumes collection by the talented Lou Collins. You can find her entire TEXT{ures} collection by clicking the collection image below.


I kept the fold very basic, making simple card folds means anyone can try them. I also wanted to focus on the stunning papers and THAT AMAZING PEACOCK wow what a statement piece. Delicate and yet bold at the same time.

This beauty was cut from a sheet of the beautiful papers in the collection which has beautiful spectrum or ombre look. It's simple but stunning .

The dies cut beautifully without any drama which is important for me. And saves us all time when they cut cleanly. 

On my sample card I cut the Peacock in white card and then coloured with sponges and distress ink.

You can see my full process on the video link below. Hopefully this can help inspire you in your creativity.

I will leave measurements below for the card so it's super easy for you to follow along and create your own.

Have fun creating xxx Amanda


Card measurements


Cut A4 cord on short side to 5 7/8" score at 1 1/2, 4 1/2 and 7 1/2"
Patterned paper. Panel one 1 3/8 x  5 3/4", panel 2 7/8 x 53/4", Panel 3 4 x 5 3/4"

Disclaimer Some of the product links used are affiliated, these do not cost you extra but by using them I will receive a small % of the sales which then help me to continue bringing you great free YouTube tutorials. Thank you so much for the support of my channel. x Amanda

Saturday, 29 January 2022

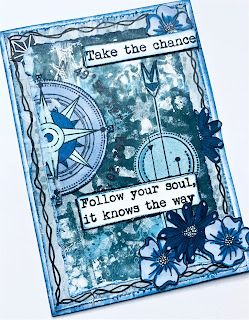
Mixed media card inspiration

 Happy Saturday

I LOVE my Saturdays I have the laziest day and try take stock of my week and just rest.

Yesterday I shared quite a lengthy video, link is below. It's in two halves so you can skip bits or run it on x2 speed. I gave a quick share of the cards I made using the  Papercraft Society kit and a fab mixed media card tutorial.

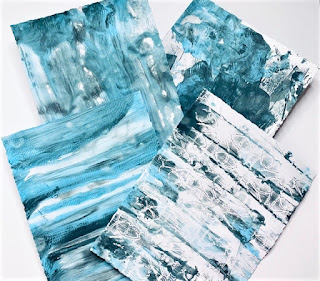
Here are some of the backgrounds I achieved.. Like many I am still learning with this fun product.

I love how each print is unique. I use these far card backgrounds these turn a meh card to a wow piece of art card.


You can make your own little piece of art so easily with this fun kit why not watch my tutorial it will help inspire so grab a brew and get comfy enjoy the video.

x Amanda 


Tuesday, 4 August 2020

Freezin' Fun card with Stampin' Up!


As summer heats up today I am sharing a cool card using Freezin' Fun by Stampin' Up!. A fun winter theme card you can use in preparation for the you know what season ... whispers ..Christmas.. without using santas and reindeer in August. 


A fun and easy card to make. The snowy background is simple ink blending over a hand cut wavy stencil just cut from scrap card. The cute characters are coloured with Stampin' Blends to make those colours pop. The Blends really are vibrant and smooth to use.

I have a fun and fast step by step tutorial for this card if you wish to try it simply click the video link below.

Happy stamping xxx Amanda


Wednesday, 8 July 2020

Heat embossing tips with Good Morning Magnolia.

Happy Wednesday everyone. Today I am re using a firm favourite Good Morning Magnolia. Whilst making this card I have filmed a tutorial giving hints and tips along the way for successful heat embossing. You can achieve many many looks with heat embossing. My favourite is simple white on coloured card.

The white embossing on Kraft or crumb cake is my all time favourite. We have also heat embossed here on vellum which takes embossing beautifully.

For a pop of colour we have a small magnolia bud stamped on white card and coloured with Rococo Rose light and dark Stampin Blends. I also show you how to colour this on the video tutorial below.

You can make this card EASILY by following my tutorial below... have fun creating please do leave a comment and subscribe to my channel and to my blog.

Happy stamping xxx Amanda


Product List


Video Tutorial


Measurements

Base 11 3/4 x 4 1/8" score at 5 7/8"
coloured layer front 5 3/4 x 4"
coloured layer inside 5 3/4 x 4" White layer inside 5 5/8 x3 7/8"
Vellum strip 4x 1"

Monday, 19 August 2019

Bloom And Grow handcoloured birthday card Stampin' Up!

Bloom And Grow hand coloured birthday card


Floral birthday or thank you cards are always popular. I created todays card using Bloom and Grow from Stampin' Up!. A bright cheery set and changing up the colours means you can make any card for any occasion. 

 I simply stamped and coloured with Stampin' Blends Alcohol markers and watercolour markers. The colours are Purple Posy, Calypso Coral, So Saffron and Pear Pizzaz. The splash of Calypso Coral clashes yet complements the Purple tones. And not by accident I gleaned that colour combo from the Stampin' Up! 2019 annual catalogue, a great too when I loose my mojo.
I think the new Purple posy is a super soft and pretty colour. I used the same colour as the background for my photo here so you can really see just how lush it is.

If you would like to try this card for yourself I have a step by step video tutorial on my YouTube.

Bloom and Grow handmade card video tutorial


Product List

Measurements to create Bloom and Grow card

Card base 11 3/4 x 4 1/8" fold in half to form card base.
Cut white card for inside to 5 3/4 x 4"
Cut DSP for front to 3 7/8x 5 5/8"
Small white panel measures 4 x 3"

Monday, 5 August 2019

Floating window card made easy.

I might sound like a stuck record but I don't do complicated card making. I like projects to look awesome but I aint got the time … or attention span … to take hours over them. Todays project is awesome and made in next to no time . Perfect !!


I find adding other mediums to card making both fun and challenging. Sometimes I want a change from plain card and stamping. Window cards are such fun and so easy to make they are a refreshing change from good old card stock.

So the basic concept is you trim away some card stock and replace it with a window sheet. On this card I did just that and then fussy cut two of the stunning birds from the Mosaic mood paper. I'm no Bill Oddy ( well know UK bird watching geeky type) but I reckon these are Humming birds ? I may be wrong but that's what i'm going for.

 All you do is add small dots of glue and stick them right onto the window sheet. Just be mindful not to have too much movement and daub glue all over your lovely window.

I do have a step by step YouTube tutorial to share with you how to make this card so you can give it a go. So why not grab a fresh cuppa, get comfy and enjoy the video.

Happy stamping xxx Amanda

Product List

Video tutorial            

Friday, 2 August 2019

Sailing Home set five ways.

I love anything nautical themed. My family and I love to cruise, its our treat to ourselves every year and so anything nautical just makes me smile and remember the awesome memories we have shared. The come sail away suite from Stampin' up! is one of my all time favourites. I have several cards to share with you using this set..


When I purchase a set I like to know I can get good use from it..I rarely use something only once. As such today I am sharing five cards in total which I created using this awesome suit.


I am sure you will agree the possibilities with this set are completely endless. I can feel more creating coming on … Also a week or so back I created a quick mini album with the set too. So I think the versatility is proven big tick on that one.

The first card I shared here today is also the card I have a YouTube tutorial on. I did a very quick and easy watercolour background. Great messy fun and I love messy crafting. So why not grab a fresh brew, get comfy and enjoy the tutorial.

The products used are available as one complete bundle as shown below or you can also purchase items individually in my online store. I just think with a bundle you know you have EVERYTHING you need .

Happy stamping xxx Amanda

Product List

Video tutorial


Monday, 1 April 2019

Ink blending tips and hand made shimmer spray.


I love ink blended backgrounds. I often see other creators such as Jennifer McGuire creating this type of card. I wondered if I could utilise my Stampin' Up! supplies to get the same look

I think we can say that is a big fat YES !!!! hello lovely ink blended background using four Stampin' Up! ink pads. Highland Heather, Melon Mambo, Mango Melody and Coastal Cabana.

My statement Thank you is from the thank you thinlits, a two piece set the second being happy birthday.

To add extra interest I made up some shimmer spray by flicking plain water drops onto my background. I let the water react with the ink and when I had the look I wanted quickly set it with my heat tool. 

Then I added Stampin' Up! shimmer paint to a small spritz bottle of water. You can make these with alcohol solution but it works fine with just water simply takes longer to dry or use your heat tool. Spray from high up to get a fine mist then heat set to dry quickly.


I added my background strip to my card base using foam strips for a little dimesion. My die cuts and been backed on self adhesive sheet so all I had to do was peel off the backing and add it to my card... hey presto a beautiful thank you card.

I do have a step by step tutorial to share exactly how to do ink blending with Stampin' Up! inks. so get comfy sit back and enjoy the video.

VIDEO WILL LOAD HERE ONCE PROCESSED

Happy stamping xxx Amanda


Product List