Pages

Showing posts with label thank you card. Show all posts

Thursday, 17 March 2022

Artful Tulips thank you card

 I have been so lucky this week to get the opportunity to help create samples for one of Spellbinders NEW releases. Todays card is created using the Artful Tulips dies designed by the talented Vicky Papioannou.

I kept this card fairly clean and simple. As simple as I could... I don't do negative space very well you you will see very subtle stencilling in my white space. I kept the colours to purple tones to make the design simpler.. and because I shall send it to my friend who loves purple.
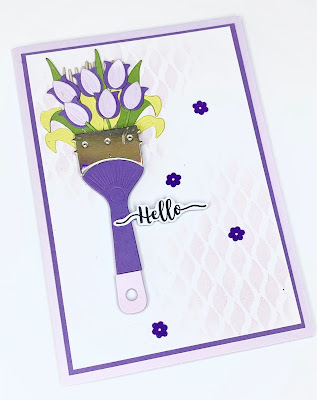


I think this turned out really pretty. I especially love how the dies also emboss, giving texture to the shapes. Also this one cuts each element separately so you can mix and match your colours. 

These are available direct form Spellbinders... Sadly I wasn't fast enough setting up my affiliate account to have personal links.. Snooze ya loose but I'm thrilled to have been part of this new release.

Thanks for sharing this card with me have an outstanding day .

x Amanda

Monday, 19 August 2019

Bloom And Grow handcoloured birthday card Stampin' Up!

Bloom And Grow hand coloured birthday card


Floral birthday or thank you cards are always popular. I created todays card using Bloom and Grow from Stampin' Up!. A bright cheery set and changing up the colours means you can make any card for any occasion. 

 I simply stamped and coloured with Stampin' Blends Alcohol markers and watercolour markers. The colours are Purple Posy, Calypso Coral, So Saffron and Pear Pizzaz. The splash of Calypso Coral clashes yet complements the Purple tones. And not by accident I gleaned that colour combo from the Stampin' Up! 2019 annual catalogue, a great too when I loose my mojo.
I think the new Purple posy is a super soft and pretty colour. I used the same colour as the background for my photo here so you can really see just how lush it is.

If you would like to try this card for yourself I have a step by step video tutorial on my YouTube.

Bloom and Grow handmade card video tutorial


Product List

Measurements to create Bloom and Grow card

Card base 11 3/4 x 4 1/8" fold in half to form card base.
Cut white card for inside to 5 3/4 x 4"
Cut DSP for front to 3 7/8x 5 5/8"
Small white panel measures 4 x 3"

Thursday, 11 April 2019

Thanks for everything ...bright floral card

 I often say I am a subtles girl .. meaning I like softer colours. BUT ..... I do love the pretty vibrant colours in the Garden Impressions Designer series paper stack from Stampin' Up!. Super prety vibrant pattern which make card making so easy as you simply use the great paper as the focus for your card.


Pairng up the stunning blues and pinks in the paper with a hint of yellow makes for a great card where the colours simply pop right out...stunning. Adding those tiny flowers to one side takes the plian look away and makes the card look finished yet it still has minimal detail. The striking sentiment comes from All Things Thanks a great set with NINE statement sentiments each as awesome as the next.


So you see sometimes we have to step away from our comfort zones and really play with colours to see what we can achieve. I will just toot the horn for Stampin' Up! here because their colours all co ordinate. So you can see the colours in the paper and find that EXACT same colour in the card and the ink ... making matching up colours so easy that you spend less time choosing and more time creating.

I hope you enjoy this card today and will give bright bold colours a whirl ... remember the Garden Impressions paper from Stampin' Up! is a great place to start. 

As always you can find everything I used today listed below.

Have a fantastic day and .... happy stamping xxx Amanda

Product List

Monday, 1 April 2019

Ink blending tips and hand made shimmer spray.


I love ink blended backgrounds. I often see other creators such as Jennifer McGuire creating this type of card. I wondered if I could utilise my Stampin' Up! supplies to get the same look

I think we can say that is a big fat YES !!!! hello lovely ink blended background using four Stampin' Up! ink pads. Highland Heather, Melon Mambo, Mango Melody and Coastal Cabana.

My statement Thank you is from the thank you thinlits, a two piece set the second being happy birthday.

To add extra interest I made up some shimmer spray by flicking plain water drops onto my background. I let the water react with the ink and when I had the look I wanted quickly set it with my heat tool. 

Then I added Stampin' Up! shimmer paint to a small spritz bottle of water. You can make these with alcohol solution but it works fine with just water simply takes longer to dry or use your heat tool. Spray from high up to get a fine mist then heat set to dry quickly.


I added my background strip to my card base using foam strips for a little dimesion. My die cuts and been backed on self adhesive sheet so all I had to do was peel off the backing and add it to my card... hey presto a beautiful thank you card.

I do have a step by step tutorial to share exactly how to do ink blending with Stampin' Up! inks. so get comfy sit back and enjoy the video.

VIDEO WILL LOAD HERE ONCE PROCESSED

Happy stamping xxx Amanda


Product List

Sunday, 24 March 2019

Elegant monotone thank you card.

My favourite colour ..after pink ...is black. My wardrobe has  A LOT of black mostly because it makes us look thinner right ? And second if your a mum it stays cleaner half a day longer. But in seriousness black is stunning, timeless and elegant. And for me this card sums it all up.
I used the beautiful large flourish stamp from Falling flowers which carried over from last year so I am scared it will leave us this time around. A beautiful and elegant set which I shall never let go of. I paired it with a beautiful sentiment from the All That You Are stamp set one of the newer sets which I chose because the font in the set is just outstanding ...another for my hoard vault.

The butterflies I fussy cut from the FREE ...yes FREE Botanical butterfly paper which you can still get with a £45.00 purchase until March 31st .. hurry hurry hurry …

I have to admit the black rhinestones are retired ...but if they ever come up on the reduced rack GRAB them and run because they are beautiful .I only have one pack but this card was worth sparing six for.

I hope you enjoyed this project as mush as I enjoyed making it. Don't forget to leave a comment to enter my blog candy give away for today.

happy stamping xxx Amanda


Product List

Friday, 2 November 2018

Easy floral thank you card.


What better way to say thank you than with this beautiful hand made card. I know when I received the top card in the photo I was blown away. It came from a lovely lady named Tricia Smith who recently joined my team... it was her thanks for being welcomed and for her welcome gift. 

I just had to share her beautiful card and have recreated it over on my YouTube making a quick and easy tutorial for you so you can make it too. 

My main aim here is to ask everyone to say hello to Tricia as she is new and just starting her Stampin' Up! journey. She does have a Youtube channel you can find her here >> https://www.youtube.com/channel/UCwEFXWpodQQSlYk82Mv_HOQ please do go show some crafty love to Tricia give her a thumbs up and subscribe.

I have left the products used and measurements below. So why not go grab a brew get comfy and enjoy the video.

Happy stamping xx Amanda


Measurements

Cut card to 11 1/2" x 4 1/8" score at 5 3/4" fold to form card.
DSP layer is 5 1/2" x 3 7/8"

Product List

Thursday, 5 April 2018

8 minute card using Beautiful Bouquet by Stampin' Up!


Some days we just need a quick card... maybe for batch making or as a last minute make. The card I have for you today is so fast you can make it in around 8 minutes. A production line style card made up real easily.

I used the Beautiful Bouquet stamp set, a stunning set with heaps of possibilities...and don't forget you have multitude of colours to choose from in the Stampin' Up! colour palette. Stampin' Up! card stock is just beautiful to work with and so I generously layered front and inside with the beautiful Powder pink and soft Wisteria wonder. Layering adds depth to your colours, helps tie it all together to add balance and also makes your card nice and sturdy

Choosing both subtle and bold colours here gives a soft yet striking look the small touches of dark navy blue inside each flower really makes the card pop.

I do have a step by step tutorial for you to follow which is super quick and products used are listed below. So grab a brew, get comfy and enjoy the video.

Happy stamping xx Amanda


Measurements:-
Card base 11 1/2" x 4" score at 5 3/4" fold to make base
Wisteria wonder layer cut 2 at 5 5/8 x 3 7/8"
Powder Pink layer cut 2 at 5 1/2 x 3 3/4"
Whisper white layer cut 2 at

Product List