Pages

Showing posts with label handmade cards. Show all posts

Sunday, 6 February 2022

Peacock Plumes Diamond fold tips and tricks tutorial


Happy Sunday everyone hope you are able to find some time to create today as it is good for the soul.

Yesterday I shared this simple Diamond fold card on my YouTube and did promise to share the measurements.

Such a striking card made easy by the stunning papers and pretty stamps by Lou Collins. You can find her TEXT{ures}collection by visiting this link for papers https://tidd.ly/3J2Eu7G and here for the stamps https://tidd.ly/3HrML4O 

Full instructions are in the video and you will find all measurements below.

Enjoy the rest of your weekend xxAmanda


Measurements


cut A4 card to 5 x 10" ( I explain on the video how to up the size if required )
on long side score at 2 1/2 and 5 "
Diamond pieces. 2 x card cut to 3 1/4 x 3 1/4", paper layer 3 x 3"
Middle inside card layer 4 3/4 x 2 1/4" paper layer 4 1/2 x 2"
little triangles on base cut ONE square if card to 2 1/4 x 2 1/4 " cut in half to make two triangles
paper layer cut ONE square 2 x 2" cust in half to create two triangles.

Disclaimer Some of the product links used are affiliated, these do not cost you extra but by using them I will receive a small % of the sales which then help me to continue bringing you great free YouTube tutorials. Thank you so much for the support of my blog . x Amanda

Thursday, 3 February 2022

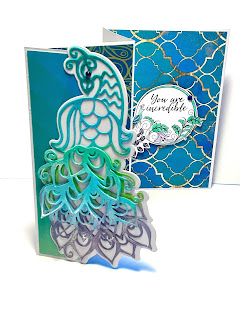
Peacock plumes concertina fold tutorial


I made a card !!! my first in a very long time.

Those who have followed my blog will know I shared cards LOTS and kinda lost my love for it. After being contacted by Craftstash UK to share some of their designers products I thought I would tip my toe back in the water. This set made me fall in love with cardmaking all over again ... there will be more to come.

I have been working with the Peacock Plumes collection by the talented Lou Collins. You can find her entire TEXT{ures} collection by clicking the collection image below.


I kept the fold very basic, making simple card folds means anyone can try them. I also wanted to focus on the stunning papers and THAT AMAZING PEACOCK wow what a statement piece. Delicate and yet bold at the same time.

This beauty was cut from a sheet of the beautiful papers in the collection which has beautiful spectrum or ombre look. It's simple but stunning .

The dies cut beautifully without any drama which is important for me. And saves us all time when they cut cleanly. 

On my sample card I cut the Peacock in white card and then coloured with sponges and distress ink.

You can see my full process on the video link below. Hopefully this can help inspire you in your creativity.

I will leave measurements below for the card so it's super easy for you to follow along and create your own.

Have fun creating xxx Amanda


Card measurements


Cut A4 cord on short side to 5 7/8" score at 1 1/2, 4 1/2 and 7 1/2"
Patterned paper. Panel one 1 3/8 x  5 3/4", panel 2 7/8 x 53/4", Panel 3 4 x 5 3/4"

Disclaimer Some of the product links used are affiliated, these do not cost you extra but by using them I will receive a small % of the sales which then help me to continue bringing you great free YouTube tutorials. Thank you so much for the support of my channel. x Amanda

Monday, 29 June 2020

Forever Greenery fancy fold, facebook live project

Yesterday I started a new series on my Facebook Business page Scrimpy's Stampin closet. Every other Sunday I will be sharing a project with you LIVE. I am calling this slot 'easy like Sunday morning live'. This Sunday I created a lovely fancy fold using Forever Greenery suite which I absolutely love !!


I am super please how pretty this turned out. I knew in my head what I wanted to achieve and this is pretty close. I love how the dies co-ordinate with the stamped images. This means you are able to cut them out real easy and build great clusters as the focal point for your card. 

The colours are outstanding too the green tones are deep and rich, yet bright and uplifting.

I did save my Facebook live and have it on my YouTube for you to watch this fun live shares the creation of the card from beginning to end.

I will leave measurements and products used below for your reference.

Please do watch the tutorial and maybe you would like to join my next live on Sunday the 12th July.

Happy stamping xxx Amanda

Video Tutorial


Product List

Measurements

Card base 11 7/8 x 41/8" score at 5 7/8" fold in half then fold top layer back over in half.
Front card base 3 1/8 x 4 7/8" white layer 3 x 43/4"

DSP for main panel of card 4 x 5 3/4" DSP for folded front panel 2 7/8 x 4"

Monday, 19 August 2019

Bloom And Grow handcoloured birthday card Stampin' Up!

Bloom And Grow hand coloured birthday card


Floral birthday or thank you cards are always popular. I created todays card using Bloom and Grow from Stampin' Up!. A bright cheery set and changing up the colours means you can make any card for any occasion. 

 I simply stamped and coloured with Stampin' Blends Alcohol markers and watercolour markers. The colours are Purple Posy, Calypso Coral, So Saffron and Pear Pizzaz. The splash of Calypso Coral clashes yet complements the Purple tones. And not by accident I gleaned that colour combo from the Stampin' Up! 2019 annual catalogue, a great too when I loose my mojo.
I think the new Purple posy is a super soft and pretty colour. I used the same colour as the background for my photo here so you can really see just how lush it is.

If you would like to try this card for yourself I have a step by step video tutorial on my YouTube.

Bloom and Grow handmade card video tutorial


Product List

Measurements to create Bloom and Grow card

Card base 11 3/4 x 4 1/8" fold in half to form card base.
Cut white card for inside to 5 3/4 x 4"
Cut DSP for front to 3 7/8x 5 5/8"
Small white panel measures 4 x 3"

Monday, 5 August 2019

Floating window card made easy.

I might sound like a stuck record but I don't do complicated card making. I like projects to look awesome but I aint got the time … or attention span … to take hours over them. Todays project is awesome and made in next to no time . Perfect !!


I find adding other mediums to card making both fun and challenging. Sometimes I want a change from plain card and stamping. Window cards are such fun and so easy to make they are a refreshing change from good old card stock.

So the basic concept is you trim away some card stock and replace it with a window sheet. On this card I did just that and then fussy cut two of the stunning birds from the Mosaic mood paper. I'm no Bill Oddy ( well know UK bird watching geeky type) but I reckon these are Humming birds ? I may be wrong but that's what i'm going for.

 All you do is add small dots of glue and stick them right onto the window sheet. Just be mindful not to have too much movement and daub glue all over your lovely window.

I do have a step by step YouTube tutorial to share with you how to make this card so you can give it a go. So why not grab a fresh cuppa, get comfy and enjoy the video.

Happy stamping xxx Amanda

Product List

Video tutorial            

Thursday, 11 April 2019

Thanks for everything ...bright floral card

 I often say I am a subtles girl .. meaning I like softer colours. BUT ..... I do love the pretty vibrant colours in the Garden Impressions Designer series paper stack from Stampin' Up!. Super prety vibrant pattern which make card making so easy as you simply use the great paper as the focus for your card.


Pairng up the stunning blues and pinks in the paper with a hint of yellow makes for a great card where the colours simply pop right out...stunning. Adding those tiny flowers to one side takes the plian look away and makes the card look finished yet it still has minimal detail. The striking sentiment comes from All Things Thanks a great set with NINE statement sentiments each as awesome as the next.


So you see sometimes we have to step away from our comfort zones and really play with colours to see what we can achieve. I will just toot the horn for Stampin' Up! here because their colours all co ordinate. So you can see the colours in the paper and find that EXACT same colour in the card and the ink ... making matching up colours so easy that you spend less time choosing and more time creating.

I hope you enjoy this card today and will give bright bold colours a whirl ... remember the Garden Impressions paper from Stampin' Up! is a great place to start. 

As always you can find everything I used today listed below.

Have a fantastic day and .... happy stamping xxx Amanda

Product List

Friday, 29 March 2019

THE perfect card for crafters.

I try my best to create something each and every day. I never go more than half a day without creating at least ONE card. The sentiment on this fun crafting theme card is just perfect and I really do think we should do as it says. I love how this fun Stampin' Up! theme apron card turned out and can't wait to send it to one of my new team members.


I used the awesome Apron builder dies to create my apron and the teeny tiny stampin' Snips... how darn cute are those ! I added a pocket and cut out a logo from my Stampin' Up! grid paper which happens to be the perfect size. I think the first genius to think of that idea was Pauline Barnfarther a UK demo with the most delightful Irish voice, she really is lovely and clever too.

I added faux stitching to my apron with a white gel pen and cross stick impression to the right edge of the card using a piece from the Stitched labels framelits set. I had to add some of the tiny button embellishments from the Needlepoint nook suite. They are just the perfect size and super cute.

The apron is based on the one demonstrators can purchase from our supplies list. You do have to be a demo to get one but with our current joining offer now is a great time to join...but this offer ends SUNDAY £170 of goods for £99 free postage its a great deal don't miss out.

I do hope you enjoyed my card today and will give it a try. There is a step by step video totorial for you to watch the link is below. I will list everything used below. Simply click the images to visit my on line web shop.

Have a fantastic weekend …. remember to create something pretty.

Happy Stamping xxx Amanda Product List
Video tutorial


Measurements

Please note I create in inches so all CM measurements are via conversion

Card base 11 3/4 x 4 1/8" score at 5 7/8" fold to form card, or 29.8 x 10.5cm score at 14.9cm
Black layer 4 x 5 3/4", or 10.2 x 14.6cm
Melon Mambo layer 3 7/8 x 5 1/2", or 9.8 x 14cm
white stamping layer 5 3/8 x 3 5/8", or 13.7 x 9.2 cm