Pages

Showing posts with label fancy fold. Show all posts

Tuesday, 15 March 2022

NEW release !!! Painted blooms card tutorial dies by Vicky Papaioannou f...


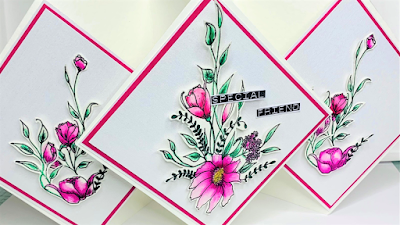
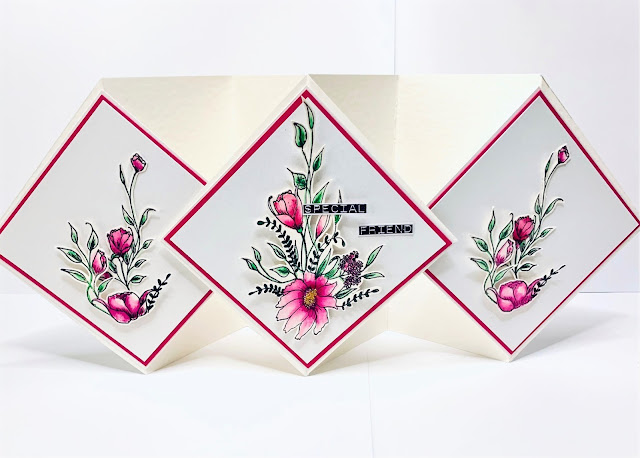
Paint your world .. I shall try card by card. Today I am sharing several beautiful cards made using a NEW collection from Spellbinders. The collection being showcased today was designed by the amazingly talented Vicky Papaioannou and the collection is called Paint your world.

My first share is this stunning tuxedo card using the Painted blooms die set.
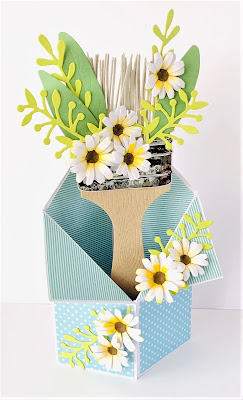
This simple tuxedo card base is made special by the stunning dies. A beautiful detailed paintbrush decorated with greenery and hand created daisies. A true wow card. 

I have a FULL step by step tutorial on this card sharing everything from the card base to how you make the flowers. You will find the link below. I have more beautiful cards to share with you as the week unfolds.

Thank you so much for visiting my blog today. You can purchase the products used direct from Spellbinders by following this link https://www.spellbinderspaperarts.com/paint-your-world/

Monday, 14 February 2022

Triple floating diamond card

Triple floating diamond card tutorial.

Hey everyone today I am sharing what I think is a different kind of fold. I have searched and cannot find one exactly the same. I call this a triple floating diamond card easy to, make hard to photograph ! 


The cards main feature of this card is the three diamond panels perfect for elaborate decoration. Those who are sharp eyed card makers will see this is inspired by the diamond easel card.. I doubled it up and created a different fold. \the Diamonds move and you can display the card several ways I came up with four different senarios depending how you stand it making this card super versatile.


I kept the card base plain so all the focus is on the stunning florals. These are created using Sketched flowers from the Floral Script collection by Lou Collins you can find the set used via this link https://tidd.ly/3gQOPaZ. I stamped using Archival ink on water colour paper and then painted the images. Once dry I cut them out but there are co-ordinating dies for this stamp
here  https://tidd.ly/3HO0MK1 for those who don't enjoy fussy cutting. I think you will agree these are simply stunning. 

I have a full real time tutorial with instructions and measurements here so you can learn this card too. I do hope you will give it a try and add this fancy fold to your collection of cards you can make easily at home.

Happy crafting xx Amanda


Sunday, 6 February 2022

Peacock Plumes Diamond fold tips and tricks tutorial


Happy Sunday everyone hope you are able to find some time to create today as it is good for the soul.

Yesterday I shared this simple Diamond fold card on my YouTube and did promise to share the measurements.

Such a striking card made easy by the stunning papers and pretty stamps by Lou Collins. You can find her TEXT{ures}collection by visiting this link for papers https://tidd.ly/3J2Eu7G and here for the stamps https://tidd.ly/3HrML4O 

Full instructions are in the video and you will find all measurements below.

Enjoy the rest of your weekend xxAmanda


Measurements


cut A4 card to 5 x 10" ( I explain on the video how to up the size if required )
on long side score at 2 1/2 and 5 "
Diamond pieces. 2 x card cut to 3 1/4 x 3 1/4", paper layer 3 x 3"
Middle inside card layer 4 3/4 x 2 1/4" paper layer 4 1/2 x 2"
little triangles on base cut ONE square if card to 2 1/4 x 2 1/4 " cut in half to make two triangles
paper layer cut ONE square 2 x 2" cust in half to create two triangles.

Disclaimer Some of the product links used are affiliated, these do not cost you extra but by using them I will receive a small % of the sales which then help me to continue bringing you great free YouTube tutorials. Thank you so much for the support of my blog . x Amanda

Monday, 3 June 2019

Centre step card made easy.

Fancy folds are such fun to create. And give the recipient heaps of joy. Today I am sharing a simplified centre step card. This is so super easy anyone can give it a try. So let me show you how.


Here we used the stunning NEW Magnolia lane paper and Good morning Magnolia stamp set. A hot new must have from the 2019- 2020 Stampin' Up! catalogue going live 4th June. The flowers are very easy to fussy cut just use a good sharp pair of scissors and take your time.

I have a fun and full step by step video tutorial for you so you can learn to make this at home. I will leave the measurements and the products used below ... It couldn't be easier.

Have fun creating xxxx Amanda

Product List

Video Tutorial


Measurements

Cut card to 8 x 6" score at 4" fold to form card
take one side and cut from outer edge on long side to the score line at 2 and 4 " then score the middle strip at 2"
DSP layers cut three at 3 7/8 x 1 7/8" layer top outer strips and layer one UNDER the middle strip.
Cut two at 1 7/7 x 1 7/8" for each of the small middle sections.
Cut two at 3 7/8 x 1 1/2" to layer over the outer strips.