Pages

Showing posts with label scrimping mommy. Show all posts

Sunday, 21 June 2020

Bloom and Grow pencil coloured thank you card.


I really do get great enjoyment from colouring beautiful stamped images with my colouring pencils. The outcome is not only beautiful and original, it is calming and mindful something many of us can benefit from especially just now in or crazy world with Covid19.


I treat myself to a large pack of varied coloured pencils a few days back and used these on this card. They aren't watercolour pencils just standard ones out what lovely colours I was very please.

I used the Stamping' Up! Bloom and grow stamp set and the THANKS comes from Ornate thanks. Together they create a lovely card. 

I created the square centre by cutting scrap card to 2 1/2 x 2 1/2 " and attached with a removable glue dot. Then as I stamped this acted as a mask. Once removed I used a black finaliser to draw out the square.

I had stamped in smokey slate in then decided it was too subtle so like a crazy lady I went around the entire image with a black fine liner. I could have just stamped again in black but the fine liner gave me such a sharp and fine outline it was worth the extra work.

I hope you will try this design for yourself and try colouring it really is calming for the mind.

Have a fantastic day.    Happy stamping xxx Amanda 


Product List

Saturday, 20 October 2018

Elegant foiled, embossed card Stampin' Up! products

A touch of luxury for this cold Saturday morning with a stunning foiled and embossed card. A slightly stepped up card, making simple use of our beautiful Merry Christmas to all thinlits and Tufted textured dynamics embossing folder.

Using these items in a simple way gives for a beautiful card. Here the colours are kept simple but the use of the foiled card and the layers of colour adds a richness to the card. A fun element is added with the sprig punch, using pearl jewels we turn the sprigs into mistletoe... how cute!

Now delicate die cut words can frankly be a bit of a pain to glue on to cards... I generally end up frustrated with signs of glue on my card front, and feel unhappy with the look. So I treat my self to the Stampin' Up! adhesive sheets, and what a revelation !!! Never again will I shy away from delicate dies for fear of ending up in a gluey mess. You simply adhere it to the back of your piece for cutting, its like double sided tape but in large sheets, so you cut your die peel the backing off and hey presto you stick it to your card. NO GLUE RESIDUE yayyyy !

I would love for you to try this card for yourself its super simple. To make it even easier I have listed all the measurements you need below along with a list of products I used. Even better I have a step by step fun Youtube tutorial for you to follow to help you create yours. So go grab a brew, get comfy and enjoy the video.

Happy Stamping xx Amanda


Product List
                                               

Measurements
card base 11 1/2 x 4 1/8" score at 5 3/4" fold to form base.
foiled layer 3 7/8 x 5 1/2"
real red layer 3 5/8 x 5 1/4"
Green dsp strip 5 3/4 x 2"
Real red card layer 5 3/4 x 1 1/2"
Embossed layer 3 1/4 x 5"

Thursday, 18 October 2018

No cut no glue box #100things


I was sat last night in my craft room just creating for fun and thought I would have a try at this origami style paper folded bow. it needs no cutting and no glue either ...amazing right. Its so simple I just had to come and share with you all. I ended up with a big pile of these so now I am going to have to think of a use for them. I will likely fill them with sweetie for an up coming Stampin' Up! event I am attending and give them as gifts.

I will warn you I take no responsibility for the fact you won't be able to stop making these once you get the hang of it. And trust me it really is super easy once you have done the first one you will be off.

I do have a step by step tutorial for this I advise you watch it through ..then watch again and pause at each step and follow each fold.

Have fun !!!! and happy stamping xxx Amanda


Wednesday, 13 June 2018

Hand stamped box and gift tags


As many of you will have noticed Stampin' Up! had a colour revamp with the new catalogue. One of the new colours being Highland Heather, the most beautiful shade of lilac which I wanted to share with you today.

I created a simple box with a hand stamped lid using the stunning new colour and the Detailed with love stamp set. I used most of this stamp set to create the hand stamped box lid, belly band, the sentiment and the tags inside. 

Now On my video I made the mistake of saying the stamp comes as a bundle with the Stitched labels framelits... it doesn't it comes as a bundle with the trio punch and I have left images and links below ..oops my mistake. The framelits accompany the stitched all around stamp set so I mixed and matched these sets.

I love how this project turned out and love the contrast f the highland heather against the Whisper white for a crisp fresh look.

I do have a step by step tutorial on this project for you to follow and I shall also leave measurements below. I do hope you enjoy this project and will try it for yourself. So why not grab a brew, get comfy and enjoy the tutorial ?... 

Happy stamping xxx Amanda 


Measurements

Box base 5 1/2 x 8 1/4" score on all four sides at 1 1/2"
Box lid 5 5/8 x 8 1/4" score on all four sides at 1 1/2" cut flaps and form box as per tutorial video above.
Band cut Coloured card to 5 5/8 x 1 3/4" cut White card 5 5/8 x 1 1/4"
Tags cut card to 4 1/2 x 2" and DSP to 1 3/4 x 3 3/4"

Product List

Tuesday, 20 February 2018

Shabby Vintage style card for GDP#126


A card can mean so much and especially when sent for a non occasion. There are more reasons to send a card than we realise, and a card can really brighten someones day. I made this card for a friend who i know is struggling right now. We all do from time to time when life can throw a curve ball. Showing we care can help. 

To help me design the card I followed this weeks Global Design project card sketch you can follow the GDP and check out this weeks challenge along with all the other entries here .

I went for a shabby vintage theme and as I didn't film this project I should relax and take my time.I distressed the edges of the middle and top layer with my lovely sharp Stampin' Up! snips. I find these better than any distress tool on the market. Using sponges I inked all the edges and blended the Sahara Sand ink heavier on the edges to give an aged look. The script stamp for the Hostess set Back ground bits has been dotted about quite randomly, and very feint, stamped of top to three times to give a faded worn look. The beautiful flower stars come from Hopeful thoughts a beautiful set to add to any stampers collection.

Stitched shape framelits were used to cut out the pretty sentiment. Using two oval sizes layered on dimensionals and backed with a trimmed down doily to add softness.

In a ll a simple yet pretty card... I do hope you enjoyed this project and will try it yourself. All the products used are listed below. Don't forget to click email subscription to my blog to get notifications of postings and also please do go over and take a look at the GDP site.

Happy stamping ... hugs xxx Amanda

Product List

Sunday, 28 January 2018

February Stampin' Selections kit


We have another fantastic kit for you this month full of inspirational Stampin' Up! products to get your creative juices flowing. The price is still £21.00 inc post and packing, UK only.

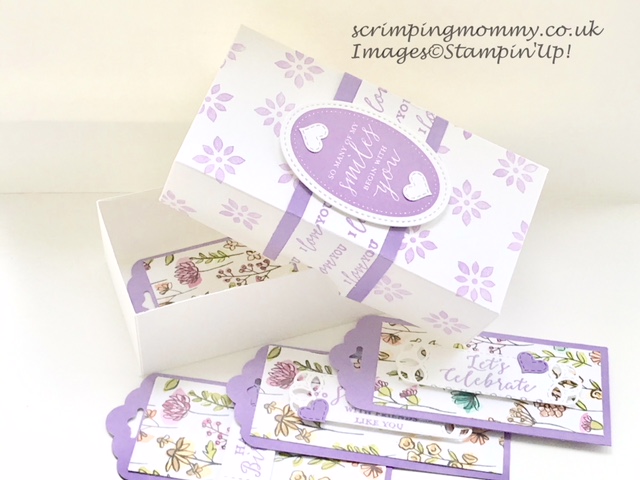
This months kit is focused on the Petal Passion suite... which I keep miss naming Petal Palette, this is actually the name of the stunning stamp set which goes with the suite.

So here are the deals for this month and then below you will find a full kit break down. If you purchase the kit this month you will earn an exclusive five card PDF tutorial. If you purchase the kit and order the stamp set at the same time, you earn the PDF tutorial AND a Sale-A-Bration free item of your choice. Order the kit, the stamp AND matching thinlits and save 10% on the bundle plus earn the PDF tutorial, Sale-A-bration free item and an extra free gift from me. 

The stamp set is a double box set and available as a bundle ( shown below) or on its own at £32.00.
February Stampin' Selections contents:- 

1. Petal passion DSP 12 x 12 half pack
2. Coloured A4 card pack ( Tranquil tide, pool party, powder pink) two of each.
3. Petal passion Memories and more sample card pack approx 8 cards
4. One Stampin' spritz complete with Pool Party custom made coloured spritz contents.
5. Pool party 3/8" shimmer ribbon, two yards.
6. Touches of nature wooden elements, sample pack.
7. White organza satin edge ribbon, two yards.
8. Subtles enamel shapes, sample pack.
9. Window sheet, one 12 x 12 sheet.
10. Basic black 12 x 12 card stock three sheets.
11. Hand made embellishment pack, minimum four hand made co-ordinating embellishments.

To order your kit simply drop me an email HERE or contact me on Facebook HERE
Payments are via Paypal or direct bank transfer. Order cut off date is the 20th February. I aim to have all kits posted by the third week in the month. If you wish to order a stamp set this will be ordered via a workshop style order in your name and as such can be shipped to me and added to your kit, waiting times would be longer than ordering direct but as your kit will ship on the third week of the month I would ensure its here in time.

Please note these offers are only available through me Amanda Charlesworth and I am acting in my capacity as an Independents Stampin' Up! demonstrator, the kits/ and or offers are in no part anything to do with Stampin' Up!, this is exclusive to me and not endorsed by Stampin' Up! Your contract of purchase is with me. Kit items are non returnable to Stampin' Up! 


Friday, 19 January 2018

Fun castle gift box


The new Myths and Magic DSP is such fun. With wizards and unicorns, mermaids and dragons you will adore this fun paper. I used mine to create this fun Castle theme gift box, complete with dealing knights and fire breathing dragons.

This idea can be adapted to any box really as what we have done is created a facade... a fake front to our box making it into a castle. I would however suggest using a box with some height and equal sized sides.
I created a very basic 3 x 3 x 3" sized bow with a lid then crated four castle shaped panels, each had hand drawn walls. I then simply fussy cut some of the cute images from the myths and magic DSP and mounted them on mini dimentionals... Super easy and quick to make and the box I used is a great size for sweet treats as a party favour or birthday gift.

If you fancy giving this project a try I have a full step by step tutorial for you to follow. measurements and products used are listed below. So grab a brew get comfy and enjoy the video.


measurements

Box:- cut card to 8 15/16th x 8 15/16" score on all four sides at 3"
Lid:- cut card to 5 x 5" score on all four sides at 1"
form box as per instructional Youtube video
Castle was cut four pieces 2 7/8 x 3 1/2" 

Product List