Pages

Showing posts with label Papercraft. Show all posts

Tuesday, 12 March 2019

Mini Magazine folder desk tidy

How to make your own cute desk storage 

We can never have too much storage am I right ? And when we can make it ourselves its just super fun. So today I am sharing with you how I made this cute mini magazine file style desk tidy. It holds 3 x 3" post it notes and note paper blocks .. so here is how.
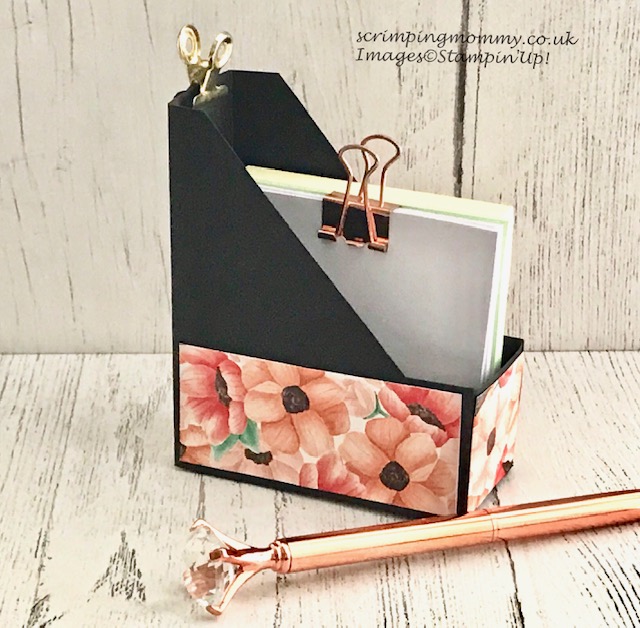

Cute as a button you can make these with minimal supplies. Make several to co ordinate your craft room. Or make these for gifts or craft fairs. Whatever the reason you will love this project.

You need one sheet of card measuring 8 3/4 x 7" . I used black as I knew it would make the flowers in the Painted Season DSP pop. This paper is currently FREE during Sale-A-Bration on qualifying orders.

I have photographed the layout after scoring, I used a white pen so you could see. The measurements and scoring are listed below.


I have a fun Youtube tutorial on how to complete this project so why not come on over and craft along. You can see my tutorial by clicking the video link ... 

I do hope you enjoyed this project as much as I do and if you make one be sure and share it with me as I love to see what you make.

Happy crafting xxxx Amanda


Product List
Meaurements

Cut card to 8 3/4 x 7"
On long side score at 1 1/2 - 4 3/4 "
On short side score at 1 1/4" but only in the second pannel onit the top and bottom do the same at 5 3/4" if your unsure watch the video above. The score at 2 3/4 and 4 1/4"
At the top mark the sides up from the score line to 1 1/2" on each side, then at the top measure out from the two inner score lines by 1/2" so that when you join these two marks up you ahave a slanted line to show where to cut a r=triangle away at each side. If your unsure see the youtube video above.
cut and assemble as per video.


Sunday, 7 October 2018

October Stampin Selection kit.


October's Stampin'Selections kit is a kit of opulence. The Joyous Noel suite has deep rich colours accented with luxurious foiling. A pure joy to work with and a suite share which will assist in you creating beautiful projects. As always the kit is £21.00 Posted.

You can up grade your kit to add any Stampin' Up! products upon request. You can also request to add the Stamp and matching punch to your kit again upon request.

To order your kit simple email me at amandacharlesworth08@gmail.com or contact me on Facebook here https://www.facebook.com/amanda.charlesworth.52 

Payment is via paypal or bank transfer and all payments and orders need to reach me by the 14th of October. I aim to post third week in the month once kits are all paid and put together. All kits are hand packed with custom finishes using elements from the suite or others which may co-ordinate.

Have fun creating xx Amanda

Full list of products and services

1. 1/2 pack of Joyous Noel Speciality DSP in 12 x 12 size.

2. 3 sheets of Joyous Noel glimmer paper, 1 of each colour 6 x 6".

3. Merry Merlot & Copper ribbon, 1 yard.

4. Gold mini sequin trim, 1 yard.

5. Copper foil sheet, 1 x 12x12" sheet.

6. Merry Merlot A4 card stock, 3 sheets.

7. Tranquil tide A4 card stock, 3 sheets.

8. Festive elements, laser cut wood embellishments sample pack.

9. All is Bright metal paper clips sample pack.

10. gold foil striped bags, Sample pack.

11. White shimmer card A4, 1 sheet.

12. Free postage.

13. Access to exclusive private Facebook group.

14. PDF inspiration tutorial sheet sent via email.

15. Hand made thank you card.

If you add the stamp or bundle to your kit you will receive an extra free secret gift.


All kits are created by Amanda Charlesworth Independent Stampin' Up! demonstrator and are in no way linked directly to or endorsed by Stampin Up!. Kits are sold with a money back guarantee if you are not happy you can return your kit and receive a full refund.


Wednesday, 1 August 2018

Blended seasons friendship card.


Earlier today my blog post shared about the new Colour your season bundle... well here is my first creation using the set. I went for a friendship card in pretty Summer colours. 

I used the new watercolour pencils and the tufted Dynamic embossing folder to create this lovely card. I couldn't resist the copper foil butterflies which are part of the tea room suite..... fluttering around the flowers these add a touch of glamour to an otherwise subtle card.

I do have a fun and full process youtube video for you to follow along to so why not grab a brew, get comfy and enjoy the video. All products used are listed below simply click to brows them in my online shop.

Have fun creating and ... happy stamping xxx Amanda


Product List

Monday, 5 March 2018

Picture perfect simple thank you cards ...

Who doesn't like a ray of colour to wish away the Winter. I certainly do, and these cards just make me smile. So bold and colourful and cheerful. Most importantly super easy.

I designed this card specifically to be made in bulk and quickly... these are my thank you cards for all who shopped with me in February. I hope they bring a smile to my customers faces when they open these bright cheery cards. 

Using the Picture perfect party DSP has to be the easiest way to create cards. The stunning 6x6 DSP pack has 48 sheets at a fantastic price point, making these cards budget friendly too. Again I am using up my 2016-18 in colour card stock here for the card bases. The sentiment is non fuss and while bold enough to stand out... does not detract form the DSP. A fantastic combination.

A very easy card to re create with minimal supplies and tools. A4 card is simply cut in half then each piece folded in half for the base. The DSP panels are then cut 1/8th of an inch smaller . The sentiment is stamped and cut by hand with the lemon lime twist used to mount the sentiment, again trimmed by had. Super easy and a great way to make a batch of cards in no time.

I hope you will give this card a try. All items used are listed below and if you wish to purchase or browse simply click the photos. 

Remember Sale-A-Bration ends on the 31st of this month so make sure you grab those free goodies before they are gone until next year. The Sale-A-bration catalogues are at the right of this post simply click to view.

Happy stamping , hugs xxx Amanda

Product List

Friday, 2 February 2018

Elegant wedding gift wallet

Wedding season is fast approaching and what better way to gift something special to the happy couple than in a beautifully hand crafted gift wallet. This is so easy to make yet looks stunning. It can hold money, gift cards or a beautiful keepsake letter perhaps. The possibilities are endless. In addition you can simply change the decor to turn it quickly into a gift wallet for any occasion.

I used the stunning sweet soiree DSP which does have cakes on some sheets. I fussy cut a few out and sat and thought what I could make. This wallet was what popped out of my head. The stunning colours in the DSP match beautifully with the shimmer ribbon in the Sale-A-bration combo pack the colour here being Calypso coral. I decided to layer over this with the beautiful Very vanilla lace trim. This then makes a pretty soft custom trim yet the colour peeks through. Subtle yet colourful. The belly band then becomes a focal point.
You could add a sentiment of your choice, I used the Happy wishes set and chose " for you" it seems generic enough, yet the cake points towards a wedding. In all a super easy project for any level of crafter to try.

I do have a step by step Youtube tutorial for you to follow and measurements and products used are listed below. So grab a brew get comfy and enjoy the video.

Happy stamping xxx Amanda


Measurements

Cut card to 7 x 7 1/2" score on long side at 2 1/4 and 5 1/4" fold to for wallet. Adhere the sides with glue or tape.
Belly band, cut card to 6 1/2 x 1 1/2" fold gently around the wallet, no scoring needed secure with tape or glue
DSP layer 6 5/8 x 2 1/8"

Product List

Thursday, 1 February 2018

Fold flat gift box with a pop of colour


Here we have a super beautiful AND useful box. Finished dimensions are 3x6x2"a great gift box size. The way this is constructed is not a new idea, indeed I was directly inspired by my latest box of MAC makeup which came is a similar box, just bigger.

So I reduced the sizing and came up with this one and you can make two of the main body from a 12 x 12 sheet. I do love the fold flat box design as you can ..well ... fold them flat. Great to make in bulk ahead of time and store until needed.
I just adore black and white. But I love it even more with a tiny pop of colour. Here I used Melon Mambo, Bermuda Bay and Berry Burst to just give the black colour a bit of a wow. And an extra wow is the stunning stamp and sentiment  taken from the petal pallet set from Stampin' Up! A stunning box yet so simple ANYONE can create it.
I do have a step by step YouTube tutorial which I strongly advise you watch to help construct the box. Measurements and products used are listed below. Don't forget you can click each product photo to be taken direct to my online shop. But for now grab a brew get comfy and enjoy the video

Happy stamping xxxx Amanda


Measurements:-

Box cut 12 x 6" score on long side at 2, 5, 7 and 10 inches
Side flaps cut two pieces 2 1/2 x 7"
DSP panels lid cut 5 7/8 x 2 7/8" , front and back cut two pieces 1 7/8 x 5 7/8"
Contract box as per Youtube video tutorial above

Product List