Pages

Showing posts with label craft fair ideas. Show all posts

Monday, 14 September 2020

Easy Mini album in a box tutorial

 Christmas is coming everyone get creating !! Handmade gifts are just the best gift to give and no waiting in line or things being out of stock all you need do is stock up on papercraft supplies nice and early.


Today I am sharing a quick and easy gift you can create which is budget friendly and time friendly. A mini album in a box.


So this gift is made to fit our pre made mini paper pumpkin boxes ..these are awesome fun to create with and I can see me making a few project with these so stock up on these ready! 

I made a simple concertina style mini album with 18 pages which fits nicely inside this box. You can dress them up or keep them simple it is up to you.

The possibilities are endless with just a little imagination you could take this idea and add to it. Idd pockets and tags or positive sentiments and fill it with photos for the recipient. A memory box of the year or years gone by. What a great gift.

I have a step by step video to share and I will leave all measurements and products used below. If you would like to purchase any of the items I use today simply click the product photograp to jump to my online store.

Happy crafting xxx Amanda


Product List 

Measurements

Album pages. Cut three at 5 x11" score at 3 1/2- 7 and 10 1/2" on each one join together on 1/2" edge. You will need to cut one extra single page 5 x 3 1/2" as the page which tucks behind the internal belly band we will place on the inside of the box lid.

Page dsp layers - 4 1/2 x 3" each 
Internal belly bad - 6 3/8 x 1" score at each end 1/2" fold over this is where it attaches to the box.

Lid decore card layer - 5 3/8 x 3 5/8"  DSP layer 5 1/8 x 3 3/8"
Front and back lip card layer - 5 5/8 x 7/8" DSP 5 3/8 x 5/8"
Side pannels card - 3 1/2 x 7/8" you need two DSP layer 3 1/4 x 5/8"

Friday, 23 August 2019

How to make a desktop stationary set for craft fairs.

Its coming to craft fair season again and so I am on the look out for fun and fast ideas. Desk top organisers, calendars and stationary sets are always a winner so I thought I would share one with you today.

A tried, tested and well loved design re created using the stunning Perennial Essence papers and co ordinating stamp set and punch Floral essence from Stampin' Up!.

As I say a fun and fast project to make and sell. I have a full step by step video tutorial for you to follow. Measurements and products used are below. So grab a fresh brew a pen and paper fro the measurements and enjoy the tutorial.

Happy stamping xxx Amanda


Product List

Video tutorial


Measurements

Cut card to 5 3/4 x 12 "
on short side score at 1/2 , 1 , 4 3/4 , 5 1/4"
on long side score at 2 , 2 1/2 , 6, 9 1/2 , 10 1/2 , 11 1/2"
Pocket.. cut card to 2 1/4 x 4 1/2 2 score on three sides at 1/2 2

construct holder and pocket as per video tutorial above 

Tuesday, 2 October 2018

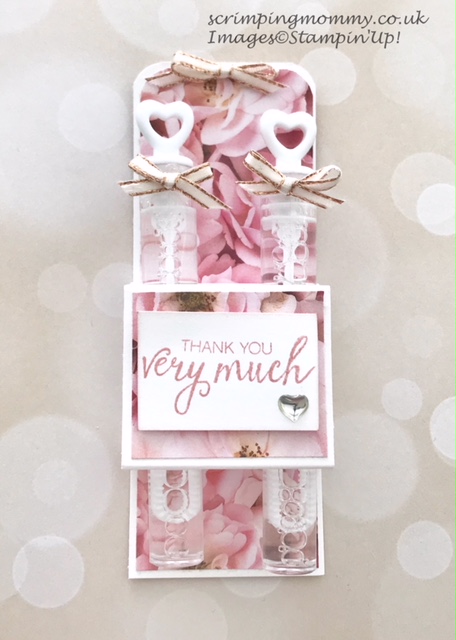
EASY bubble wand favour, craft fair idea #100things


Making your own favours and gifts is made so much easier when you have good quality products to work with such as Stampin' Up!  I made this small gift with minimal supplies I had in my general crafty stash. One staple I can't live without is the Stampin' Up! Thick Whisper white card and pretty DSP ( designer series papers). These two basic staples are like having an onion and  great stock .... you can make anything with them.

So here I came up with a super quick and easy gift or favour to hold to bubble wands. These are inexpensive to buy and often come in packs of ten for just £1.00. I got mine in our pound shop.


A great little gift for wedding favours, baby showers, stocking fillers, secret Santa, swaps ... inhale deep breath... co-worker gifts, school yard gifts, teacher gifts ... and you can sell these on your craft stalls too. So why not get creative. These also store flat so you can batch make them and store in a smaller space win win !

I do have a full step by step tutorial for you to watch. I apologise in advance if I mumble a bit I have a huge bad head today and often mumble and talk more gibberish than usual ... but if your a follower I am sure your used to me by now ha ha ha . So grab a brew get comfy and enjoy the video. Measurements are below as are the products used which are available to purchase through my online shop at www.scrimpingmommy.stampinup.net or click the shop now button to the right of my blog.

Happy stamping xxx Amanda

VIDEO WILL LOAD HERE ONCE PROCESSED CALL BACK SOON XXXX 


Measurements

Back panel :- 4 3/4 1 3/4"
Bubble holder :- cut card to 5 x 1 3/4" score at 1 1/2, 2 1/4, 3 3/4 and 4 1/2"
Front DSP panel :- 1 5/8 x 1 3/8"
Back panel DSP :- 4 5/8 x 1 5/8"

Product List

Saturday, 24 March 2018

Coffee helps !!!! treat holders


Coffee themed treat holders !! how cute are these ?.... I absolutely loved creating these fun treat cups which I will gift at the up coming Stampin' Up! event. These make great teachers gifts or for co- workers, such fun and most people like coffee right! Even if they don't the Coffee Cafe set has stamps to make shakes so its a win win for those who prefer a cold drink theme too.

I took my inspiration directly from the 2017-2018 Annual catalogue, not only full of great products but fantastic inspiration. I often have a look if I am struggling for ideas ...its my Stampin' Up! bible! I have recently been working on my wish list ensuring I have my favourites and this is a recent purchase for me...I wish I had gotten it sooner its amazing!

There is co-ordinating DSP (designer series paper), but for this project I stamped my own background using the cute coffee bean trio stamp. I created two similar ,but slightly different designs. You can cut the coffee cups just as they are in different colour card, or you can stamp them, then cut them out . The thinlits match the shape of the stamps perfectly making this an easy set to use and helping you create fantastic projects with ease.
I used the mini coffee cup die to cut out the coffee cups in the DSP as its exactly the perfect fit !... I then used these to create fun paper clips ...so its like I have two projects in one here.


I filled my cups with coffee sachets and biscuits and sweets ... perfect for my Stampin' Up! buddies when we get to meet up in April.. and yep we will need lots of coffee as no doubt we will be up to the small hours having fun and chatting ... super excited!!! 

I do have a fun step by step tutorial for you to follow on my YouTube and all the products I used are listed below. You don't need ALL of them these are just what I used .... the main feature is the bundle that's where the fun lies.... 

So go grab yourself a cup of real coffee , get comfy and enjoy the video.

                                   
Happy stamping xxxx Amanda


Product List